Downloads
One app for Windows, Mac and Linux.
Start a session in your browser with nothing installed. Add the desktop app when you also want the other person to control this computer's mouse and keyboard. Same download, same steps, all three systems.
Ready to use
Two ways to connect.
Screen sharing and viewing work in the browser on every platform with nothing installed. The desktop app adds one thing the browser cannot do on its own: letting an approved person move this computer's real mouse and keyboard.
Development preview · unsignedReallexi Connect desktop app
Install this on the computer you want to be able to control. It adds a small icon near your clock with a single On/Off switch, so this computer only accepts sessions when you say it can. Every session still asks your permission first, shows you who is connected, and can be stopped instantly.
Requires Node.js 20 or later on the computer you install it on.Ready to useBrowser app · nothing to install
Open it in Chrome, Edge, Safari or Firefox and sign in with your email. You can share your screen, watch someone else's, and use a device as a second display straight away.
Open the app Turning it on, step by step.
Each system asks for permission before any program is allowed to move your mouse and keyboard. That prompt is the operating system protecting you, and it only appears once. Here is exactly what to expect.
Windows
- Install Node.js 20 or later from nodejs.org if you do not already have it.
- Unzip the download, then run the install step inside the folder.
- If Windows shows a blue "Windows protected your PC" box, choose More info, then Run anyway — this appears because the preview is not yet signed.
- Close and reopen Chrome or Edge.
- Find the Reallexi Connect icon near your clock and switch it On.
Windows does not ask for a separate permission for mouse and keyboard control.
macOS
- Install Node.js 20 or later from nodejs.org if you do not already have it.
- Unzip the download, then run the install step inside the folder.
- Open System Settings, then Privacy & Security, then Accessibility, and switch Reallexi Connect on.
- In the same Privacy & Security list, open Input Monitoring and switch Reallexi Connect on there too.
- Close and reopen Chrome or Edge, then switch the menu-bar icon On.
macOS requires both Accessibility and Input Monitoring. Without them the session will still show your screen, but the other person's mouse and keyboard will do nothing.
Linux
- Install Node.js 20 or later using your distribution's package manager.
- Unzip the download, then run the install step inside the folder.
- Close and reopen Chrome, Edge or Chromium.
- Switch the tray icon On.
On Wayland, screen sharing uses your desktop's own screen-share prompt. Some Wayland desktops restrict programs from moving the mouse and keyboard; if control does not respond, an X11 session is the reliable option today.
You decide when this computer is reachable.
The switch near your clock is the master control. Off means this computer refuses every session, including from people you previously approved, and immediately ends anything already running. On means it will ask you before each session — it never connects silently.
For servers and machines with no one at the keyboard
Running without a browser at all.
The same package also runs with no browser open and no one present at the machine — useful for a server, a machine in another room, or anything you don't want to keep a browser tab open on. It reaches your account over the same signaling connection the browser app uses, so it never needs an inbound port or a public address.
- 01
Install Node.js 20 or later and the desktop app package on the headless machine, the same as above.
- 02
Run reallexi-cross-platform-agent-enroll — it prints a short code and a link.
- 03
From any browser you're already signed into (a different device is fine), open Devices → Link a headless device, enter the code, and approve it.
- 04
Run reallexi-cross-platform-agent-headless. It's ready immediately and reconnects on its own if the network drops.
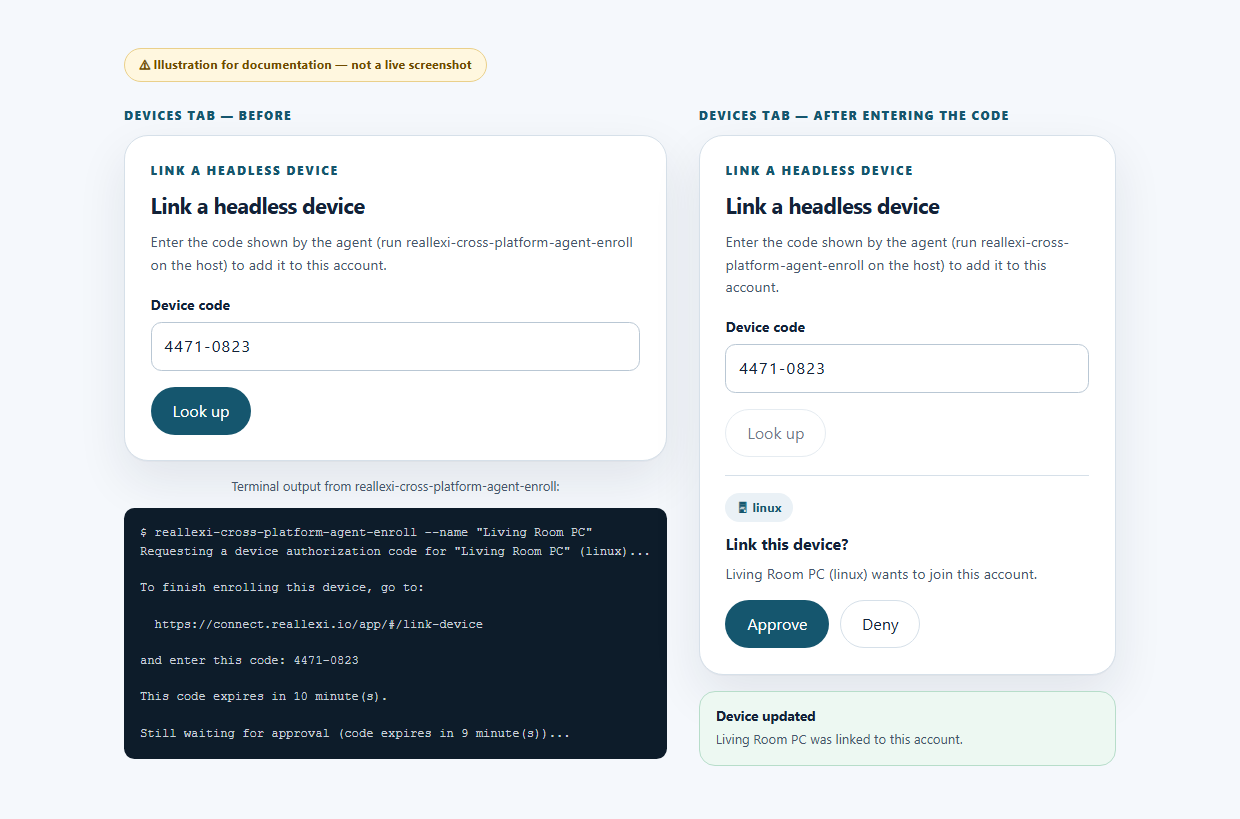
A session only starts without a prompt when the account has already auto-approved that specific requester — there's no one at the headless machine to ask otherwise. Requires ffmpeg on PATH for screen capture.
Other packages
You do not need any of these for normal use. They exist for specific situations and for people testing the project.
Development preview · unsignedWindows native build
An alternative Windows-only build written in Rust. It does the same job as the desktop app above and has had more testing on Windows specifically. Use it only if the main download gives you trouble.
Development previewAndroid app
For joining and sharing from an Android phone or tablet. Signed with a development certificate, so Android will warn you during installation.
Development previewBrowser and editor extensions
Optional extras that add session notifications to Chrome and Edge, and a panel inside VS Code.
Not available yetiPhone and iPad app
Not available yet. Use the browser app on iPhone and iPad — it already works as a full viewer and can receive a shared screen.
Getting started
From nothing to a working session.
Do these in order on both computers. It takes about two minutes and you only do it once per device.
- 01
Open
Go to the app on both computers and sign in with your email address.
- 02
Name each device
Give each one a name you will recognise, like "Office PC" or "Mum's laptop".
- 03
Install (optional)
On the computer you want to control, install the desktop app and switch it On.
- 04
Ask to connect
From the other device, pick the computer you want and choose what you need — viewing only, or viewing plus control.
- 05
Approve
The computer being controlled shows who is asking and what they want. Nothing starts until someone there says yes.
- 06
Stop any time
A banner stays visible for the whole session. Stop ends it instantly, from either side.
Updates
How updates reach you.
Updates are published as complete versions with a published checksum, so you can always confirm you have the file we published.
- →Version built
- →Checksum published
- →Checks pass
- →Released
- ✓You choose when to update
Before you install
These are previews, and we say so plainly.
These are development previews, not production releases. None of these downloads are signed yet, so Windows and macOS will warn you when you open them. That warning is accurate: it means the file has not been certified by Microsoft or Apple, not that we have hidden what it does. The checksums below let you confirm the file matches exactly what we published. Install these only on computers you own or administer.